Showing posts with label Free Pattern. Show all posts

Thursday, February 2, 2012

Floating Squares Quilt Pattern

Introducing my newest pattern...Floating Squares


71" x 80 

You will need:

4 yards brown fabric
1 ¾ yards orange fabric
1 ¼ yards cream fabric
4 yards backing fabric


Cutting Directions:

All strips are cut WOF (Width of fabric)
14 - 5" strips brown, sub cut 7 strips into 56 - 5" squares
4 - 2 ½" strips brown, sub cut into 56 - 2.5" squares

8 - 3 ½" strips brown for the border
7 - 5" strips cream, sub cut into 56 - 5" squares
7 - 5" strips orange

8 - 1 ½" strips orange for the border
9 - 2 ¼ strips brown for the binding 


Making the 4 patch blocks:
With 7 brown strips and 7 orange strips sew a 5" strip of brown to a 5" strip of orange along the long side.
Press towards the brown.
Sub cut the strips into 5" pieces making each piece 5" x 9 ½".
Repeat with the other 6 strips to make 56 pieces.


Sew the 56 pieces together to make 28 brown and orange 4 patches


Making the Bowtie blocks:

First you need to get your machine ready. Do you have a marked line or a piece of tape along your 1/4" line? Just about everyone I know around here does. What you do is put your needle in the down position and raise your presser foot. Insert a ruler against the needle and lower your presser foot. Line up a line on your ruler perpendicular to a line on your machine table so you know your ruler is straight, ie. the 4" line on the ruler. Then with a fine point sharpie draw a line against the ruler or place a 1/4" piece of tape in the same spot. I didn't have any 1/4" tape when I did this so I used a piece of painters tape that I cut with my rotary cutter to 1/4". And don't worry about the sharpie, you can always remove it with denatured alcohol.


With the 56 cream 5" squares and the 56 brown 2 ½" squares:
Place the brown 2 ½" squares on the top right corner of a cream 5" square. Make sure they edges are even.


Start sewing at the place where the top left corner of the brown square begins. Keep the bottom right part of the brown square even with the tape line on your machine and continue sewing till you reach the bottom right point of the brown square.


Make 56 of these
Trim the brown triangle piece that is closest to the cream point off. In other words the part you will not see. This will keep the integrity of the square in case your points are a little wonky
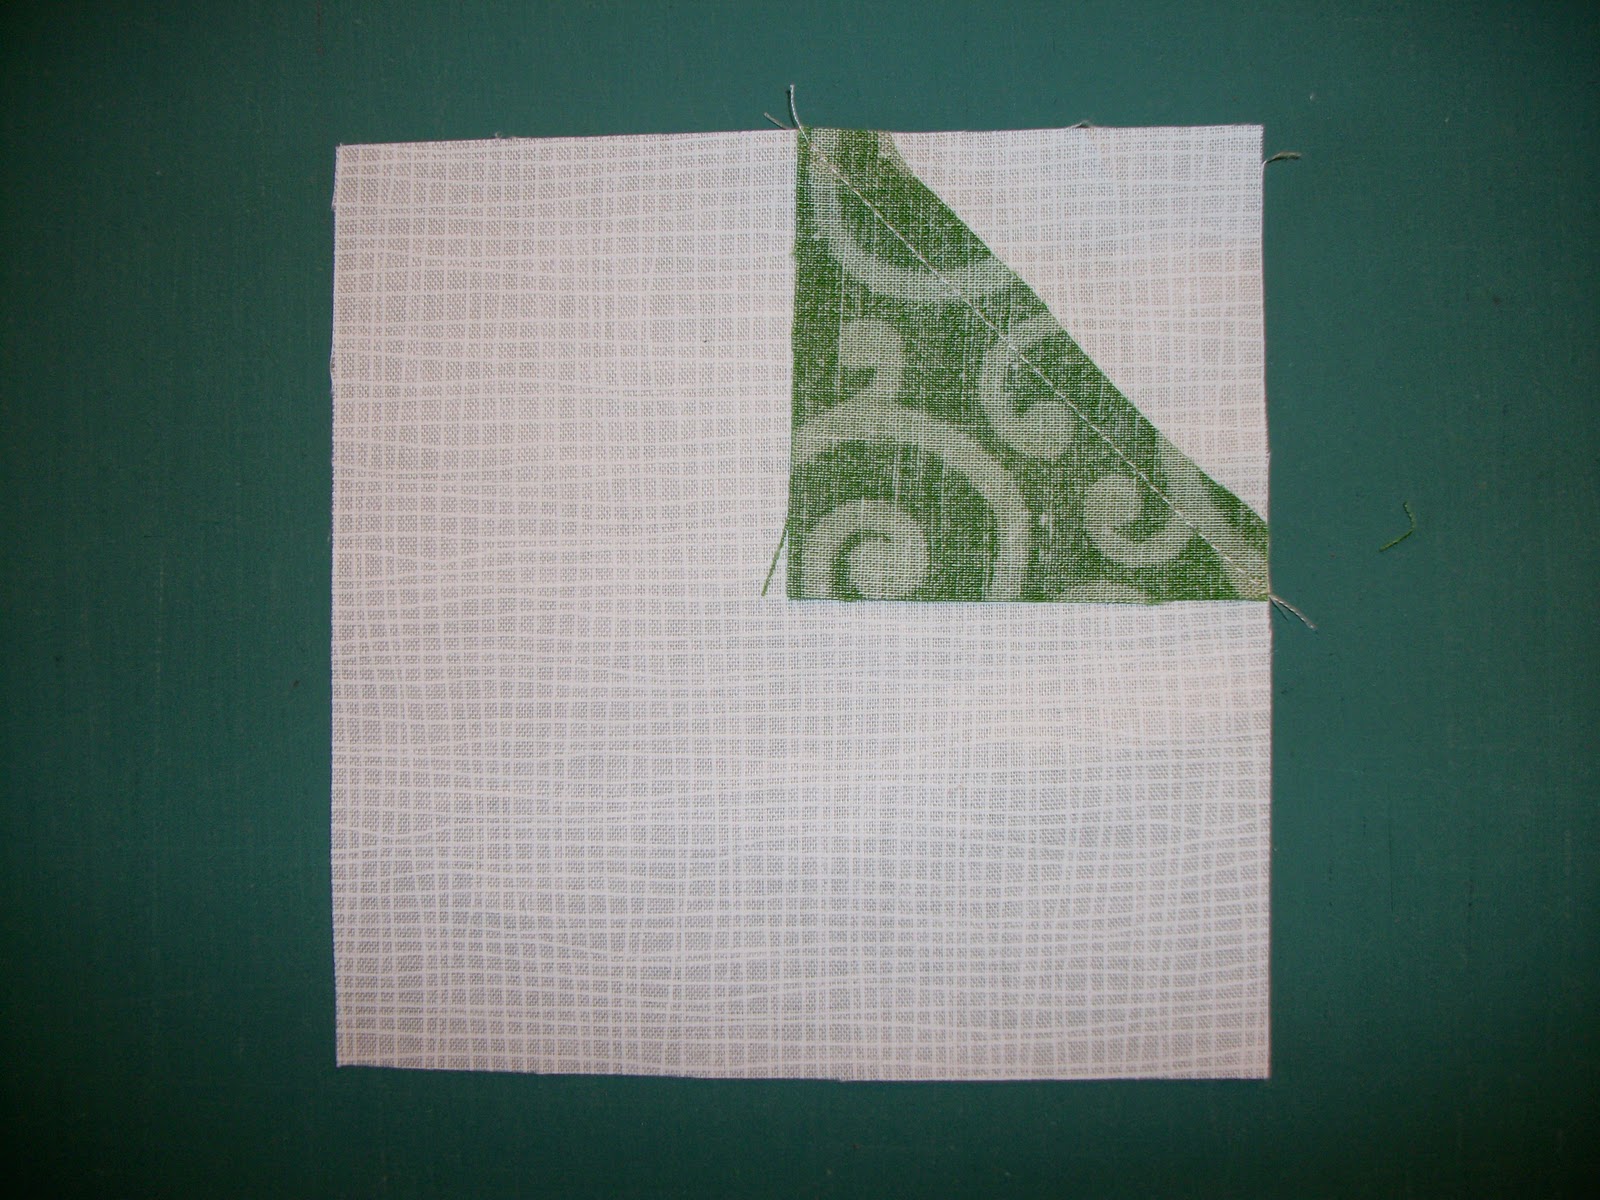
  
Press the points over and you will have 56 connector squares


Sew a connector square to a brown 5" square. Be sure they are sewn together like the picture below. Make 56 sets.


Sew 2 sets into a 4 patch to make the bowtie blocks. Make 28 blocks.


Putting it all together:

Using the diagram below sew 4 rows like this, pressing towards the left


and 4 rows like this, pressing towards the right.


Then sew the rows together

 
Adding the borders:

Sew 2 orange 1 ½" strips together along the short side. Make 4 sets of these. Sew the 2 side borders on and then the top and borders on.

Sew 2 brown 3 ½" strips together along the short side. Make 4 sets. Sew the 2 side borders on and then the top and bottom borders on.

Baste. Quilt and Bind as you would like.


I hope you enjoy this pattern!

Wednesday, February 1, 2012

Valentines Day Showcase

Today I am kicking off the Valentines Day Showcase at Sew Bitter Sweet Designs!

Love (Two red hearts)

The tutorial I am doing for the Showcase is the Love Braids table runner that I showed you during V-Week.


Be sure to hop on over to the Sew Bitter Sweet Blog, Michelle has an awesome giveaway starting today!

Here's the rest of the Valentines Day Showcase Bloggers:

February 2nd – Connie from Quilting by the River
February 3rd – Vicki from Sassy Blog
February 6th – Kris from I don’t have a problem, I have a well-rounded fabric stash!
February 7th – Melissa from Sew BitterSweet Designs
February 8th – Debbe from Pieces to Love
February 9th – Lyanna from Purple Panda Quilts
February 10th – Jenna from SewHappyGeek
February 13th – Lisa – future food and craft blogger
February 14th – Michele from
Quilting Gallery

Be sure to visit their blogs everyday too and tell them Sha sent you!

And speaking of Valentines projects I took part in a Valentines Day Craft from And Sew We Craft. Here's a pic of the mug rug I made for my swapee. To find out how I made this check back in February during the Twist Along!


Wednesday, January 25, 2012

Valentine Table Runner & Where I'll Be

If you are looking for the Darling Heart Garden FQ bundle giveaway click here.

Do you cook for your someone special on Valentines day? I do. I plan the menu for days and make a big deal of it. We eat at the grown ups table with real plates and silverware and everything :)

I don't know how this happened, but with all the table runners I have made I've never made a V-Day one. Well that has changed. I now have this table runner to use every year!


It's made the same way as the Mug Rug from Monday.

I can't give you the tutorial just yet, that has to wait till February 1st when I kick off the Valentines Day Showcase at Sew Bitter Sweet Designs. 

Another guest blog post I have coming up is on February 8th. I'll be sharing another tutorial for a fun Valentines project at Sew Sweetness' Blog.

And my Valentines projects will end with a Red/White project as part of the Quilters With Modern Tools blog hop. If you are not familiar with this group head on over the Insights From SewCalGal blog and check it out.

But if you just can't wait for the tutorial here's a hint...
The center is 8.5" and the strips are from a jelly roll.

I hope you are enjoying this series, I know it makes me happy to work on these projects with all this great fabric filled with hearts and stuff.


Monday, December 12, 2011

PamKitty Morning

The first part of the Blog Hop Party Giveaway can be found here and the second part can be found here. Don't miss out on the $50 gift certificate prize from the Fat Quarter Shop.


Today's Designer Select FQ kit is by PamKitty Morning. Pam Vieira-McGinnis is the designer of all this wonderful fabric. She has an adorable blog called PamKitty Morning with some really cute free patterns. Be sure to check it out.

1 reason I just adore this fabric line is that there are so many different types of fabric in it, not to mention its bright which is what I am all about. And there's so many different prints...letters, flowers, berries, dots, stripes, plaids, checks...so many different combinations, you could make several quilts with it and not have any repeating fabric.

Here's some things Pam has made with her fabric.


.

What do you think? Adorable right? Pam was a new designer to me, which is one reason why I love the Designer Select FQ Club, you get FQ kits of different designers and might just find a new favorite. I know I have. I haven't used the FQ kits yet, but I plan on making a cute bag for the spring time with it.

There's even a Pam Kitty Pinwheels Quilt Kit, available only at The Fat Quarter Shop.


Now that you have seen some of her adorable fabric and projects do you want to know a little bit about Pam? She was happy to answer my craizee quiz. And while we're on the subject of the quizzes...they are usually just guessing games, you will find the answers out at the end of the week, but it's always fun to see what y'all guess.

1. What is Pam's favorite holiday?
A. Christmas
B. New Years
C. 4th of July
D. Easter

2. What was Pam's favorite food the day she answered this question?
A. Chips and Salsa
B. Turkey
C. Pumpkin Pie
D. Pizza

3. What color is not among Pam's favorites?
A. Pink
B. Purple
C. Green
D. Blue

4. What is Pam's favorite sports team?
A. The New York Giants
B. The San Francisco 49ers
C. The Baltimore Ravens
D. Whats Football???

So how well do you think you did? I'd love to hear your answers. Check back next weekend for the answers to all the quizzes this week.

And don't forget to remember to enter the giveaway I am having.
There's 2 ways to enter it...
Part 1 can be found here and Part 2 can be found here.

Friday, December 2, 2011

Welcome to the Blog Tour of Quilts

Today I am happy to be part of the Blog Tour of Quilts that Sally from Sally's Quilting Corner put together. To those who hopped from Sally's blog welcome to Craizee Corners! If you are a follower of Craizee Corners please check the rest of the hop out :)

I had planned on making a wall hanging and a new tree skirt, but my gallbladder decided it needed to be taken out which sidelined me for a while. That put a dent in my plans so I don't have anything new to show you, but I do have something old that I haven't posted about before.

22 years ago we were living in New Hampshire. I wanted to learn to quilt then so I signed up for a class to make a Christmas tree skirt. I had no idea what I was doing and this was the only thing I made back then.


The 5 points are made of a log cabin started with a diamond. The strips were 2" each and the diamond in the middle was 4". It was done with the quilt as you go method. I started with the diamond shape on top of the batting which was on top of the backing. Then I sewed on each piece, right sides together and then flipped it. Once I get some time I will write a tutorial for this up to explain it better.

This year we will only be putting up a small tree so I will have to make a small one at some point during the month, after I have recooperated that is.

Another Christmas project I made was the Countdown to Christmas table runner. You can get the free pattern here.


What kind of holiday projects are you making this year?

The next stop of the Blog Tour is Scrap-bags by Jamie Kalvestron...please hop on over to see her great projects.

Thanks for joining me on this Blog Tour of Quilts, I hope you enjoy the rest of the tour :)

Thursday, December 1, 2011

Have you seen the Bernina blog We All Sew?

I hope you have but if not your should check it out right away, you can find the link here.

There's 1 very important reason for you to check it out...

I have a project on the front page!
If you missed the day it was on the front page here's the link to it.
It would be great if you stopped by and said hi on that post and tell them Sha sent you.

The other reason you should check it out is that I find lots of great ideas and inspiration on it.

Off to recuperate some more now,

Thursday, November 17, 2011

UnNamed Block

If you are looking for the Nifty Notion Rulers giveaway click here.

A few weeks ago I was asked by Jane of QuiltJane to share a new block I had designed. I said yes and was very excited. Then confusion settled in and for some reason I got this mixed up with another upcoming blog hop I am in. So I am sorry if you came here earlier to see this block post. Between my confusion and not knowing the time difference (plus internet problems this a.m.) this is a bit (well maybe more than a bit) late. 

If you are visiting from QuiltJane please have a look around.
I am excited to be part of the Desperate Houswives Quilt. Jane is showing us 100 quilt blocks, 2 every week.

Today I have a block that was used in my first pattern, which was published last week. I call the table runner Countdown to Christmas


I have yet to decide on a block name. So I need your help in naming it. What do you think?
The table runner is made with 12" squares, but I am going to make the block a little smaller with directions for an 8" square to fit into the Desperate Housewives Quilt if you are making it. See the original pattern for the 12" version.


Note - I have linked back to other tutorials I have posted on my blog. You can follow these directions or make the HSTs by your preferred method. The finished squares will be 2".
You will need

¼ yard red fabric
¼ yard white fabric
¼ yard green fabric

Cut 4 - 2½” squares and 8 – 1½” squares out of the green fabric.

Following the directions found here make 12 red/white Half Square Triangles from 2½” strips. Note - If you use an alternate way to make HSTs make sure they are 2 1/2" after squaring up.
On 8 of the red/white HSTs you will be sewing the green 1½” square onto the white part. See this tutorial to learn to sew on connectors.
8 of your red/white HSTs will now look like this.

You will now have 3 different type of blocks.
A.      4 - Green 2 ½” squares,
B.      4 - Red/white HSTs
C and D. 8 - Red/white HSTs with a green connector.

Make a 4 patch using this pattern, repeat to make 4 – 4 patch blocks.

Sew the 4 – 4 patch blocks together according to the diagram below.
Note - C and D are the same block.


This block will measure 8 1/2" unfinished.

Thanks Jane for letting take part in the Desperate Housewives Quilt Block Show

Wednesday, November 16, 2011

Stepping Stones over the Terrain

If you are looking for the Nifty Notions Ruler giveaway click here.

Today I have another quilt top to show you that used half square triangles (HSTs). I started this quilt in October during the Kate Spain Designer Select Month. I just finished it this past Saturday night at Sit and Sew at The Berry Patch. It was fun letting the gals there help me get the layout just right. Then I took the top 2 rows off the design wall to sew together and made a big mistake. I sewed the top row under the bottom row (no turning it over didn't help) so we had even more fun figuring out how to fix it.

Even though I used a different technique to make the HSTs it still worked with the layer cake pieces. Instead of a 4 7/8" strip I used a 4 1/2" strip. This quilt was just scrappy enough for me to feel comfortable and still experiment with different fabrics. This quilt only had 64 HST, 4 for each block, so it went pretty fast. I found that making 1 or 2 blocks at a time was the best way to approach this pattern.


What I love about this pattern is that the white squares are the pronounced part so the HSTs are kinda in the background, even though they are there...does that make sense? Sometimes I think my brain is scary.

I have seen the project sheet for Good Fortune and the quilt has a similar play on squares so I will be making a sister to this one eventually.

Tomorrow I am guest blogging at QuiltJane...Want It, Need It Quilt! Be sure to check that out! I need help naming the block I posted about so please help me.

Have you tried using a HST ruler yet or are you waiting to see who the winners are of the ruler sets before you get one? You have till Saturday, November 19th to enter. (Click here).

Sunday, November 6, 2011

My first pattern...AKA Countdown to Christmas Tablerunner

Here's my very first pattern. I love all things Sweetwater including Countdown to Christmas. You can get some Countdown to Christmas at The Fat Quarter Shop.

Here's the PDF version.

Countdown to Christmas Table Runner


Fabric:
¼ yard Green                                                  16”x40” piece of batting
¼ yard Black                                                    16”x40” piece for backing     
½ yard Red
½ yard White

Note - this can also be made scrappy as long as you get the same number of squares cut.

Strips are always cut width of fabric (WOF)

HST = Half Square Triangle

Cut (the other pieces will be cut according to the technique you use for your HSTs)
12 green 3 ½” squares
24 green 2” squares

You will need to make 8 black/white HSTs
You will need to make 28 red/white HSTs

Note – If you are using a HST ruler make sure you read the how to directions first.

Here’s 2 different ways to make the HST’s.
Using a HST ruler:


Cut
2 - 3 ½” strips of red
3 - 3½” strips of white
1 - 3½” strips of black.

Place a white and a black strip right sides together. Starting with the ruler facing
this direction (like a right triangle) cut your first set of triangles. Usually it’s the direction that has the writing right side up so you can read it.


Flip the ruler and cut the second set of triangles. Continue until you have 8 black/white triangle sets and 28 red/white triangle sets cut.


Starting with the part of the triangle set with the flat tab, line your needle up with the left corner of the tab and sew using a ¼” seam allowance to the bottom of the triangle.


Make 8 black/white and 28 red/white HSTs

** See the pressing directions before pressing.

Traditional HSTs:

Cut
2 - 3 7/8” white strips, sub cut into 14 - 3 7/8” squares
2 - 3 7/8” red strips, sub cut into 18 - 3 7/8” squares
1 - 3 7/8” black strip sub cut into 4 - 3 7/8” squares

Put a black and a white square, right sides together.
Draw a diagonal line on the white square from point to point.
Sew using a ¼” seam on both sides of the drawn line.
Using a rotary cutter, cut along the diagonal line to make 2 HSTs. Trim to 3 ½”.

Make 8 black/white HSTs and 28 red/white HSTs.

Pressing: Very important

Press half the black/white HSTs towards the white and half towards the black.
Press half the red/white HSTs towards the red and half towards the white.


Adding the Connectors:

On all 8 black/white blocks and 16 red/white blocks (8 pressed towards the red and 8 pressed to the white)  you will be adding a 2” green connector to the white half of the HST block.

See this tutorial http://craizeecorner.blogspot.com/2011/10/corner-triangles-aka-connectorsa.html for an easy no-draw way to attach connector squares

OR you can do it the traditional way of drawing a diagonal line on the 2” squares and sew along that line.

I suggest only cutting the middle piece (the unused part of the connector) and not the bottom 2 layers, that will keep the integrity of the square and make piecing easier.


Putting the table runner together:

You will have 4 different squares at this point.
A – 12 - 3 ½” green squares
B – 12 - 3 ½” red/white HSTs with no connectors
C – 8 - 3 ½” black/white HSTs with green connectors
D – 16 - 3 ½” red/white HSTs with green connectors

Layout the blocks following the diagram below. Starting with the top left Block B alternate the direction the blocks were pressed. This will make matching the points easier. Make each star block and put them together.  To make sure the points match nestle the seams together on the diagonal when you are sewing the blocks together. The points will meet at one point.


Baste, Quilt and Bind as you normally would.

There you have it...a table runner that can be made for any season. Instead of the 4 A blocks put together you can fussy cut a 6 ½" square to go there.