
71" x 80
You will need:
4 yards brown fabric
1 ¾ yards orange fabric
1 ¼ yards cream fabric
4 yards backing fabric
Cutting Directions:
All strips are cut WOF (Width of fabric)
14 - 5" strips brown, sub cut 7 strips into 56 - 5" squares
4 - 2 ½" strips brown, sub cut into 56 - 2.5" squares
8 - 3 ½" strips brown for the border
7 - 5" strips cream, sub cut into 56 - 5" squares
7 - 5" strips orange
8 - 1 ½" strips orange for the border
9 - 2 ¼ strips brown for the binding
Making the 4 patch blocks:
With 7 brown strips and 7 orange strips sew a 5" strip of brown to a 5" strip of orange along the long side.
Press towards the brown.
Sub cut the strips into 5" pieces making each piece 5" x 9 ½".
Repeat with the other 6 strips to make 56 pieces.

Sew the 56 pieces together to make 28 brown and orange 4 patches

Making the Bowtie blocks:
First you need to get your machine ready. Do you have a marked line or a piece of tape along your 1/4" line? Just about everyone I know around here does. What you do is put your needle in the down position and raise your presser foot. Insert a ruler against the needle and lower your presser foot. Line up a line on your ruler perpendicular to a line on your machine table so you know your ruler is straight, ie. the 4" line on the ruler. Then with a fine point sharpie draw a line against the ruler or place a 1/4" piece of tape in the same spot. I didn't have any 1/4" tape when I did this so I used a piece of painters tape that I cut with my rotary cutter to 1/4". And don't worry about the sharpie, you can always remove it with denatured alcohol.

With the 56 cream 5" squares and the 56 brown 2 ½" squares:
Place the brown 2 ½" squares on the top right corner of a cream 5" square. Make sure they edges are even.

Start sewing at the place where the top left corner of the brown square begins. Keep the bottom right part of the brown square even with the tape line on your machine and continue sewing till you reach the bottom right point of the brown square.

Make 56 of these
Trim the brown triangle piece that is closest to the cream point off. In other words the part you will not see. This will keep the integrity of the square in case your points are a little wonky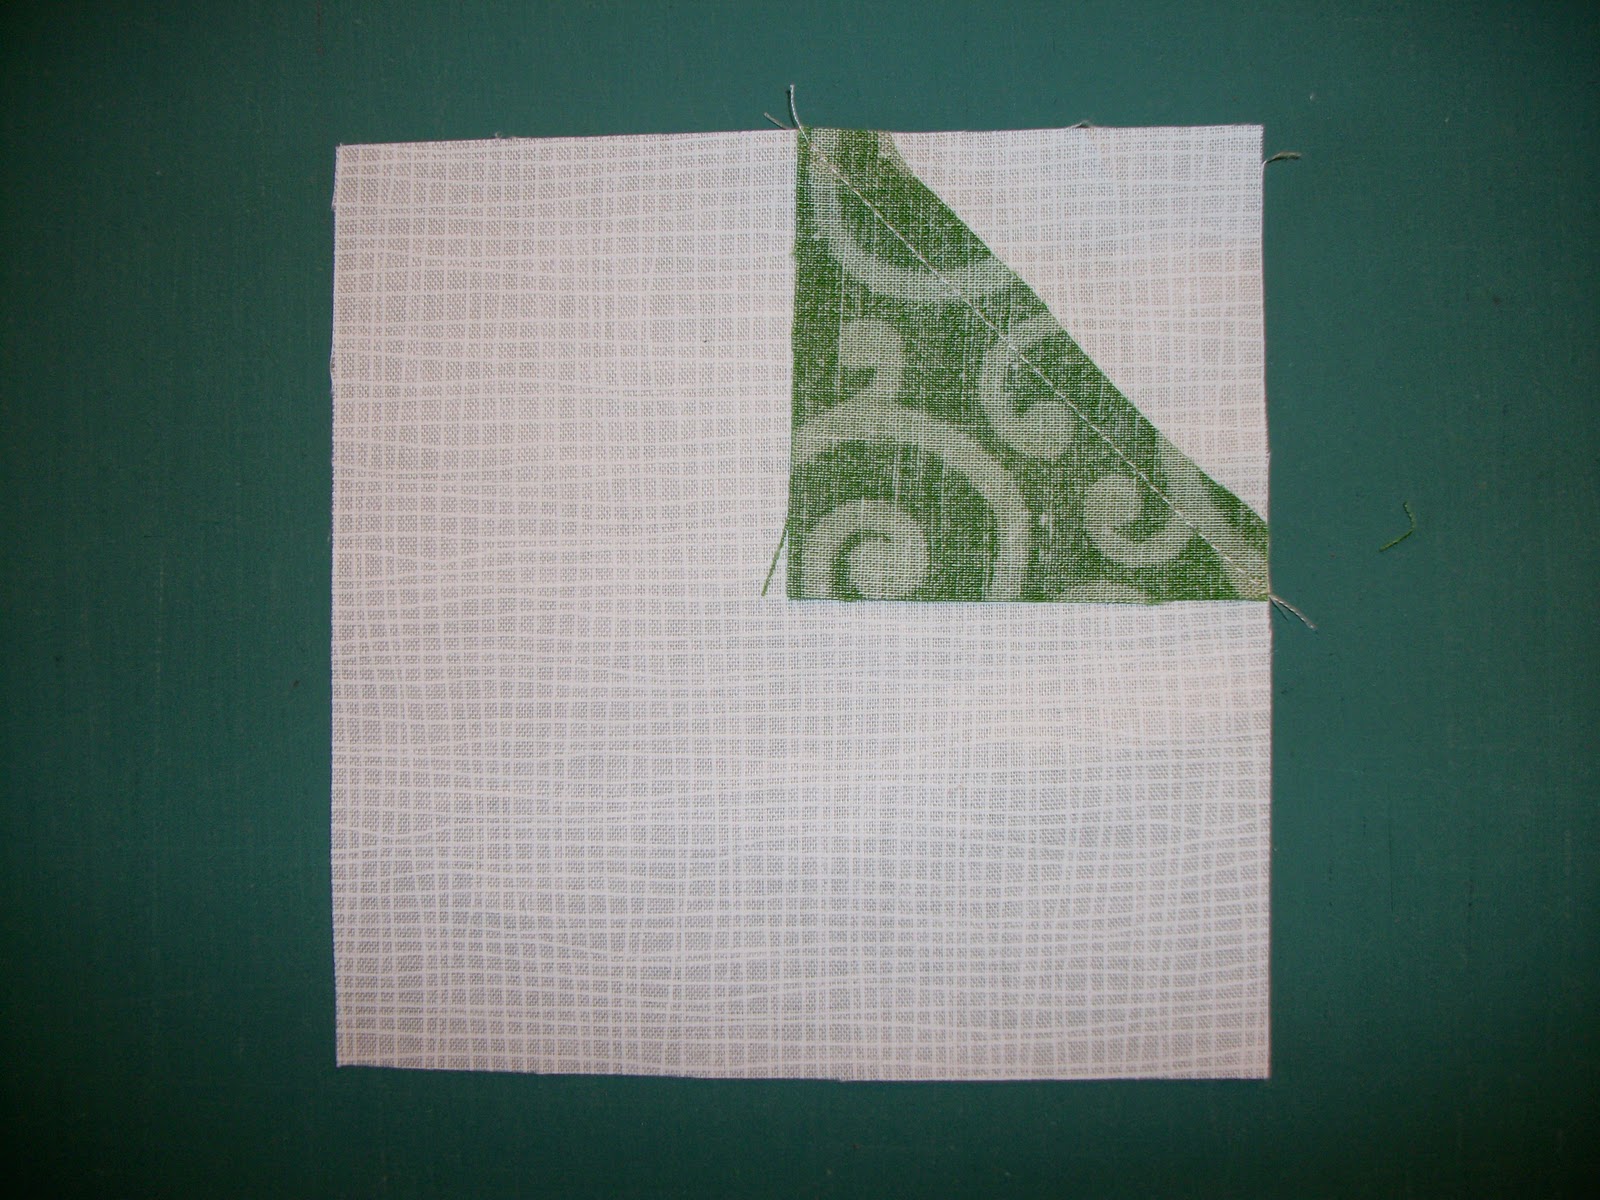
Press the points over and you will have 56 connector squares

Sew a connector square to a brown 5" square. Be sure they are sewn together like the picture below. Make 56 sets.

Sew 2 sets into a 4 patch to make the bowtie blocks. Make 28 blocks.

Using the diagram below sew 4 rows like this, pressing towards the left

and 4 rows like this, pressing towards the right.

Then sew the rows together

Adding the borders:
Sew 2 orange 1 ½" strips together along the short side. Make 4 sets of these. Sew the 2 side borders on and then the top and borders on.
Sew 2 brown 3 ½" strips together along the short side. Make 4 sets. Sew the 2 side borders on and then the top and bottom borders on.
Baste. Quilt and Bind as you would like.

I hope you enjoy this pattern!

That's AWESOME looking!!! I LOVE IT!!!
ReplyDeleteAbsolutely beautiful - and very masculine too with the colors (it is so hard to find masculine quilts!!!). Congratulations :)
ReplyDeleteYou've created a beauty here! I love the colours you've chosen. :)
ReplyDeleteCarolyn
NEAT! YOU'VE CREATED A KEEPER!
ReplyDeleteTHANK YOU FOR SHARING!
love the pattern - thanks sha! :)
ReplyDeleteI like that block combo its pretty cool.
ReplyDeletehttp//richardquilts.blogspot.com
Love the result, the way you place the blocks. The finished quilt looks much more difficult than it actually is. Thanks fonthe tutorial!
ReplyDeleteThanks for sharing. I love this quilt.
ReplyDeleteSHA! It came out great!!!! Good job! <3
ReplyDeleteThis is awesome ! thanks for the great tutorial !
ReplyDeleteYour directions are written so well and easy to follow. Thanks for the tutorial.
ReplyDeleteFabuous tutorial, bow ties has been a block I have wanted to try for a while.Am thinking this would make a great tablerunner.
ReplyDeleteBlessings
Gail
What a really cute pattern you came up with. Your tutorial is great and I love that it is big enough to snuggle under.
ReplyDeleteLove it, thanks so much for sharing it with us!
ReplyDeleteReally good tutorial! Thanks for making it free :).
ReplyDeleteCheers,
Robyn
Great pattern Sha! Thanks for sharing it with us and doing a great tutorial. Us visual learners appreciate that. hehe. Congratulations!
ReplyDelete