Showing posts with label giveaway. Show all posts

Tuesday, March 27, 2012

EQ7 Winner

How I wish I could give each and everyone of you a prize, your comments were great!

As of this moment 'Apricots' is winning by 11%. Here's the link again so you can check out the results.


Yesterday I played some more with EQ7. I registered for the FREE online BOTM class on Craftsy by Amy Gibson. One of her February blocks is made with HST's and you know how they are my favorite thing to use in quilting, I knew I just had to make a chunky chevron quilt using the block she showed us.  I wanted to see how it would look in the color and size I wanted to make so I plugged it into my EQ7. Here's my finished result. The colors are much brighter, I'm going to use the Crazy Daisy fabric I ordered from FQS a while ago. There's so much that you can do with the program.


And just for fun I did this same design in the Quilt Design Wizard pretty easily too. The QDW is a great first step to use.

Now for the winner of the EQ7 program...

Here are your random numbers:
53 
Timestamp: 2012-03-27 16:57:40 UTC

Congrats to Leah! you are number 53 and the winner of the EQ7 program! Leah has a quilting blog called Leah @ L3 Designs and does some great work.

Come back tomorrow for the continuation of my blog anniversary celebration with a goodie from Fat Quarter Shop. To get you ready for your entry tomorrow check out the FQS's It's Sew Emma patterns. Come back tomorrow to see how you can get in on the fun!

Thanks again to EQ for taking part in my blog anniversary celebration!


Tuesday, March 13, 2012

Disappearing 9 Patch and EQ

If you are looking for the EQ7 giveaway click here!

On my last post I showed you some Disappearing 9 Patch quilts I made. Then I remembered this wonderful charm pack of California Girl by Fig Tree that I got and knew that I had to use those wonderful charms for a Disappearing 9 Patch project. Plus I have the cutest mini charm pack of California Girl to use for this also. I don't have enough for a big quilt, but I am playing around with some other blocks to add to this project from other Fig Tree lines.

What would a project be without some kind of tutorial from me? And given that the series for the week is EQ7 I got some more play time with my computer as well.

One of the great things about EQ7 is the ability to bring in your own fabric swatches that you need. It's great to have that ability to really see what the block or quilt will look like. I imported the California Girl fabric swatches and had tons of fun with it.

Here's a quick tutorial on how to make a Disappearing 9 Patch quilt. Note - I am thinking of putting all my tutorials on a separate blog to make the tutorials easier to find, what do you think of that idea?

Stay tuned for my finished Cali Girl quilt :) and a giveaway of a California Girl charm pack!

Thursday, March 8, 2012

Blog Anniversary Give Away #1

Electric Quilt 7Announcing the first of several great giveaways for the month!


As many of you have guessed the first giveaway is your very own EQ7! I know everyone wants to get their hands on this gem of a program and here's how you can get in the drawing.

You must be a follower of Craizee Corners to enter, but you don't get an entry for that (I can check very easily), it's just a pre-requisite.

For your entry go to the Fabric of the Month page on the EQ7 site and vote for your favorite palette, then come back here and tell me which one you voted for. Simple as that...no jumping thru hoops with a bunch of ways to enter.

And while you are there why not check out the other fun things EQ offers to go along with the program.

This giveaway will end on March 13th at 11:59 PM. I will call Tyler the next morning and ask him to pick a number randomly for the winner, it only seems fitting that he be Mr. Random for this giveaway since it is his quilt, Floating Squares, that I showcased earlier. 

Thanks to the Electric Quilt Company for celebrating my blog anniversary with me! Be sure to check out my blog post on the Quilting Design Wizard
So get to voting and good luck!

Wednesday, March 7, 2012

Today a friend of mine is visiting to kick off the EQ7 part of the celebration! Last month I helped Sally transfer files from the Quilt Design Wizard to a JPEG file and when I saw here beautiful quilt designs I knew I had to have her visit Craizee Corners. She has some great new designs to show you and guess what? She is working on her very first pattern too. So make sure to visit her blog Sally's Quilting Corner often to see whats shes up to!


Hi quilters my friend Sharon at Craizee Corners has reason to celebrate. Her blog is one year old...She sure has had an exciting yr... All of her creations are so beautiful and the talent, well what could I say about her talent that everyone else hasn't already said...She graciously asked me to come visit her blog and tell her what I like about EQ7 because she is celebrating EQ7 week. Well I have a copy of Quilt Design Wizard and love it, but there are limitations then I was very lucky to get the EQ7 program and just love it!!!  The fabric selection along with the colors alone can be overwhelming because there are so many possibilities to work with... Then you get into designing your patterns with the block library and all I have to say is  OH BOY!!! I have been playing a lot with this program and I have created a few things that need some editing, but I thought I would share... Let me know what you think... I can't imagine if they add an update to this program, I may have to change careers...
The first pattern I created was from Quilt Design Wizard but I reconfigured things and created it on EQ7, and this is what I came up with. I called this wall quilt Crossflower Boxes. I think for my first one it didn't turn out too bad... What do you think...

Photo is the property of sallysquiltingcorner.blogspot.com and copying is prohibited, March 2012


These photos and design is owned by

www.sallysquiltingcorner.blogspot.com and copying of this photo is prohibited. March 2012.

I would like to thank Sharon for inviting me to share her excitement about the blog birthday and about celebrating EQ7 week... I hope you all have a good time seeing my creations.

Aren't those designs great? I know that I plan on making the Crossflower Boxes quilt as soon as the pattern is available. I'm thinking of using bright batiks, what do you think?

So now that you have seen the first special post of the month can you guess one of the things for the giveaway? I'll be posting how to win it tomorrow so stay tuned!

Thursday, February 16, 2012

2 QSTs + 1 HST = Turnstile Block

Do you know what this is called? I didn't until I checked on EQ7 and saw its called a Turnstile Block. I always called it a Double Pinwheel, which it might also be called. If you know of any other names for this block please let me know.


This block uses 2 QSTs and 1 HST and is very simple if you follow all these directions.

1. You need to know what size your finished squares will be. A square in this instance looks like this.


I want to use these squares on the next border on my Swoon quilt. Since it's currently 64.5" x 64.5" I decided that I want the blocks to be 4" once sewed together and onto the quilt. This is your finished square size.

Once you know the size you want to make these squares you can figure out what size strips you need.

For the HST add .5" to the finished size, which is 4.5".
For the QSTs divide the finished square size in half, 4/2 = 2. Then add .5" to that number, which is 2.5" 

So you will need a 4.5" strip of the fabric for the HST (purple) and a 2.5" strip of each of the 2 QST fabric (pink and orange).

Cut the HST's and QSTs by following the tutorials I have already posted. If you missed them you can find them on the Ruler Series Tutorial page here.

2. I find it helpful to layout the pieces so I know what part to sew. 


3. Sew the 2 QST's together along the short sides as shown above. Press open. You have just made a HST out of 2 QSTs.


4. Place the 2 HST's next to each other before you sew to make sure your sewing on the correct line.


5. Sew along the long diagonal line, as you would any HST. Be sure not to pull the fabric or it will come out wonky. Press towards the purple.


6. These can be used to make a Turnstile block or as a border (like I am planning on doing).


There you go another way to make this block without drawing on the back of the fabric or having to square anything up.

Don't forget to enter the giveaway for 2 Nifty Notions Rulers. Click here to enter.
Note - you can link anything up, but leaving a comment isn't an entry so please link up.

Till next time,

Wednesday, February 15, 2012

QST & HST = Flying Geese

How do you make flying geese blocks? I know there are several different techniques out there from drawing on the back of a square to make the wings to having to square up your flying geese blocks after sewing them. But the technique I use is so much easier...no drawing on the back of blocks, no squaring up and virtually no wasted fabric.


Here's how:
1. Figure out what height size finished flying geese blocks you want to make. I wanted my blocks to be 4" high. Add a half inch and that is the size strips you will be working from. In my case the strips needed to be 4.5".
2. Cut a 4.5" strip of the geese fabric and of the sky fabric.
3. With the geese fabric, use the Nifty Notions Quarter Square Triangle (QST) ruler to cut your pieces. Cut 1 per flying geese block you want to make. Here's a tutorial on how to cut the QSTs.
4. With the sky fabric, use the Nifty Notions Half Square Triangle Ruler *HST) to cut the sky pieces. Cut 2 per flying geese block you want to make. Here's a tutorial on how to cut the HSTs.
This is what the pieces will look like.


5. Flip the right side sky piece (orange) over so the diagonals are aligned. This is your sewing line. Sew along the line and press towards the sky.


6. Repeat with the other piece of sky fabric. Press towards the sky.


There you go, a flying geese block that you don't have to draw any lines for or square up and has virtually no waste.


So what do you think? Are you ready to try this technique?


Don't forget to enter the giveaway to win a set of 2 rulers from Brewer Sewing. Just link up anything you have made with fabric. It doesn't have to have triangles in it but if you had a project with triangles I'd love to see it. You can find the link here.


Until next time


Sunday, February 12, 2012

Winner!!!

Mr. Random picked this weeks winner...

Here are your random numbers:
14
Timestamp: 2012-02-12 18:20:42 UTC

Who is Jennie P! When looking at Jennies contact info I saw that she has a brand spanking new blog called Eclectically Delicious. Why not check it out?

Jennie P I have emailed you.

Thanks to everyone for playing along!

Nifty Notion Ruler week starts tomorrow, I'll be showing you borders you can easily make with the Nifty Notion rulers I have already done tutorials on.

And remember to come back later for the first installment of the Twist Along!

Saturday, February 11, 2012

Retired & Quilting with Frolic

If you are looking for the Designer Select FQ bundle giveaway click here

Today's visitor is Patti Shanks. I found Patti on flickr and just loved her Sandy Gervais quilt! I knew she would be a perfect addition to this week!

Hi Everyone!
Big thank you to Sharon for asking me to do a to guest post on her wonderful blog.
My name is Patti and I blog at www.retiredtoquilt.blogspot.com
This is my first ever guest post and I am so pleased that the topic is fabric!
More specifically, Sandy Gervais!
When I first started quilting (I  am just into my 3rd year), I knew absolutely nothing about fabric and designers.
My eyes were opened in a big way when I discovered online quilt shops with all the newest fabric by amazing designers.
I started shopping....and shopping :-).
Sandy Gervais was one of the first fabric designers that I was immediately drawn to. I had no idea what I was going to make, but I had to have Frolic!! 


Oh, the colours!!
The amazing array of designs!
Flowers, leaves, geometric design...
It was love at first sight for me.
It wasn't until I started making a baby quilt which I named Kissing Koi, using a fabulous tutorial by Lee at Freshly Pieced, that I became more aware of scale, and since the HST's finished at 2", I was thrilled that none of the fabric design was lost in the finished quilt.
I had quite a few of the Frolic prints and a couple of Sandy's Plaids, so most of the quilt is made from her fabric lines.
I did have to supplement a few other fabrics to make all the fish.


Okay now, please don't look too closely at my piecing! Ha! I still consider myself a beginner....I  am wondering how long that feeling lasts!!
Seriously, how cute are these darn fish!!

 Here is the finished quilt.....

This baby quilt measures 39"x50"
Thanks again to Sharon for a wonderful week of Sandy Gervais, and for inviting me to do a guest post.
I've had an amazing time here.
In the interest of full disclosure......I also made a quilt using Giddy!!
Yup! I'm a Sandy Gervais addict!

Thanks Patti, I just love that quilt!  

Remember to enter the giveaway for the Designer Select Sassy kit. You have till tomorrow morning at noon.


Thursday, February 9, 2012

Day 4 of Sandy Gervais Week

If you are looking for the giveaway click here.
Today's guest blogger is Aubrey from Mauby's (say that 3 times fast). Aubrey has an amazing amount of tutorials on her blog, about all different types of fabric things, several were made with Sandy's fabric. Take it away Aubrey... 

I cannot remember the first line of Sandy's that I fell in love with, but I know that each one I have seen has spoken to me as a sewist/quilter.  When I started to read Sandy's blog I fell even more in love with her work! She's a little bit goofy, definitely witty, and so talented!

And in case she is reading this, just want to take a moment and say, "HI! Sandy! Love your work!" 
Throughout 2011 I wrote one tutorial a week and several of them featured Sandy's lines, I figured a good way to go over my love affair with Sandy's fabrics is to show you all some of these projects.


To start there was my Valentine Mug Rug which is a great small project to start on and just perfect for the upcoming holiday!  Whip one up for the one you love! :)
The fabric in the mug rug is from the L'Amour line which I fell absolutely in love or amour with (insert my own dorky chuckles here)! 

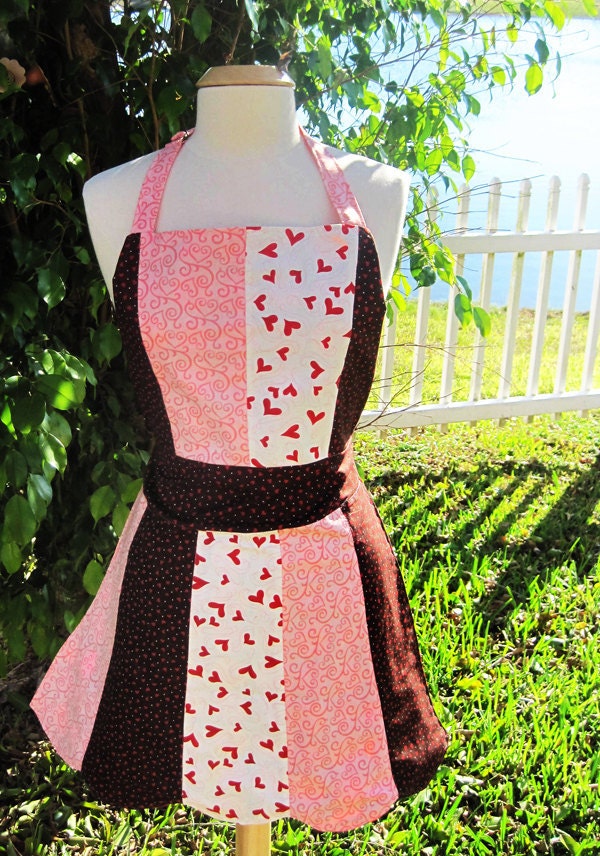
You can see some more prints from the L'Amour fabric line in this apron I designed.  The pink swirls were fabulous and the little red hearts on the chocolate canvas, wow!  This remains my favorite valentine line of all time!

I have a fascination with charm packs, I just adore those piles of 5" squares, and coming up with things to do with them.  This line goes awhile back (about 5 years or so) from 2007, Celebrate Spring.  I was just about to say how much I liked this line, and stopped realizing that I love ALL of Sandy's lines.  Easter is really just around the corner, so here's another small project to put together a Candy Pouch:


Here are a few more items I put together with Celebrate Spring charm squares:


And to finish I have to tell you all how much I really loved Frolic!  I made a lot of stuff for myself from that line!  Re-usable snack bags, light weight scarves, a quick wall hanging.  So many fun things!


I still think this little wall hanging is a 10 on the super cute scale!

I thought I put together more tutorials using it, but I must have used up so much for myself that I only had enough fabric to put together one, the  Tiny Ruffle Purse:


So that's a quick overview of my obsession with Sandy Gervais fabric lines.  If you haven't read her blog you definitely check it out here: http://piecesfrommyheart-sgervais.blogspot.com/.  Happy (almost) Valentines day!  My little guy and I are going to make some honey sweetened chocolates - Yum!  Maybe we will wrap them in my L'Amour scraps - how fabulous would that be??

That's some great eye candy,huh? And the best part is that now you have more fun tutorials to use, Be sure to check out Aubrey's other tutorials on her blog and tell her that Sha sent you!

Tomorrow Quilt Jane visits to show us her Lollipop quilt that was featured on Moda Bake Shop (Yay another free pattern!).

And don't forget about the Twist Along starting soon.

Tuesday, February 7, 2012

Sue From Sweet Jane's here!

If you are looking for the giveaway click here.
Today Sue from Sweet Jane's Quilting and Design is here to talk about a quilt she made with Sandy'snewest line Sassy. I recently found Sue's patterns while 'window shopping' at Fat Quarter Shop :) Her patterns are great! I already have a few on my todo list now!

Thank you Sharon for asking me to share my Sandy Gervais quilt on your Blog! I LOVE Sandy Gervais! I think I bought 3 fat quarter bundles of Frolic, my ALL TIME FAVORITE line of fabric!

I am a quilt pattern designer, and my company name is "Sweet Jane’s". I love looking at Flickr and all of the improvised quilts that people make. There are so many talented quilters out there that just follow their instincts and make beautiful quilts that are one of a kind and amazing! I wanted to try to write a pattern that let people make an "improvised" one of a kind quilt, but with the guidance of a pattern! I decided to write a pattern that uses random lengths of strips. As long as they end up measuring 2 ½" wide, you can use them. It is really a perfect scrap quilt, but I wrote the pattern for layer cakes and fat quarters as well.


I had a lot of fun making the quilts for the pattern. I toyed with the width of sashing to use between the blocks. I thought 2 ½" wide was too little, so I made this quilt with a 3" sashing and I think it is perfect. I also thought putting a border on it would be too busy. It has enough going on in the body of the quilt! My pattern is called "Sassy Frass", I incorporated the "Sassy" fabric name. My friend named it for me, I am terrible at thinking up the names!


Thanks for listening to me chat about my work! Happy quilting!

Thanks Sue for showing us that fun and Sassy quilt! If you are interested in purchasing any of her patterns you can find them in her etsy shop or at The Fat Quarter Shop.

Don't forget to enter the giveaway for a Designer Select FQ kit!

Come back tomorrow for another visit by Rachael Arnold!