Sunday, July 31, 2011

Go! Baby and a Baby Quilt

Look what came for me on Friday!


I won this from Sew Inspired  and true to my word the first thing I used it for was to make 2.5" strips for a jelly race quilt. I ordered the 2.5" strip die, the diamond die and the Rose of Sharon die set.

Jeanne Gwin from The Learning Curve has been collecting items for the victims of the Joplin tornado. So my first project was to make a baby quilt for her cause. I had some left over Lily and Will 2, which I though was perfect for a baby quilt. I have to tell you that I wasn't sure how much I would use the 2.5" strip die, but I can honesty say that I will use it a lot!  Yes I could just cut strips with a rotary cutter, but this was so much easier and more accurate, not to mention more fun :).

Here's the quilt I made for Joplin. The fun part of this quilt pattern is that you never know how it will come out. I think this one looks like buildings on a street (crooked ones). I even tried a new way to do binding on a quilt and love it!. If you haven't done so yet you should check out Mauby's series on bindings. This was was so easy and the corners come out great!

So a big Thank you to Vicki at Sew Inspired and Accuquilt! The Go! Baby made today easier and fun at the same time!

Sha :)

Thursday, July 28, 2011

I'm getting a divorce from the Farmer

Like many of you I jumped on the Farmers Wife book with enthusiasm. I even collected a bunch of fat quarters in aqua and red for the project. So I set off to make a few blocks and after a while I started to dread making them. I just don't enjoy using templates and trying to figure out the correct size to cut the blocks with a ruler was taking way too much time so...

While I love reading the letters in the book, I will be leaving my Farmer behind. I am sure he will understand and will find a better wife, someone who really appreciates him and can make him happy. And I will cheer on all the wives who are still with their Farmer.

Sha :)

Wednesday, July 27, 2011

Crayons and triangles = Crangles???

Have you ever made 2 quilts at once? I don't mean have several WIPs (Work in Progress) I mean sew 2 at the same time? That's exactly what I am doing. Here's how...

You know when you use a thread saver, startee/stoppee, sew on/sew off or whatever you call it (the little piece of fabric you sew onto before you remove the fabric from your machine)? Well I decided that instead of using that little piece of fabric over and over that I would use that thread and time to work on a different quilt. So instead of those little pieces of fabric I am sewing another triangle onto my 'Crangle' quilt. (this is a great way to work on a tumbler, triangle or scrap vomit quilt too). I am using 2.5" triangles, 2816 to be exact. And that's where I need your help.

I would like to do this quilt totally in fabric by Me and My Sister Designs. I have always loved their bright fabric. I have a bunch and will be buying a bunch of Amelia, but I want more diversity. As you can probably guess 2816 triangles is a ton. So if you have any scraps that you would like to share please let me know. Any size pieces over 3" square will work. Just leave me a comment or find me on twitter and I'll send you my info.

Sha :)

Tuesday, July 26, 2011

Quilt in a Day

This Saturday I am taking a 'Quilt in a Day' class at The Berry Patch in Fort Worth. Here's the quilt I will be making.


So I got to go on a little shopping spree at the LQS's near me. Among other things I got this fabric for this quilt. The pic on the left shows the star fabric (the bottom blue), the large diamond fabric (the brown) and the small diamonds (the light fabric). The pic on the right is the border material. The background is white. What do you think?


I also got more goodies. I am making a crayon quilt with triangles out of any fabric from Me and My Sister designs so I added to that stash a bit. I got more black and white fabric for the Civil War Block of the month club and the green fabric I need for the Swap a Rainbow Part 2. All in all a very productive and fun morning. 


I'd love to see your new goodies!
Sha :)
 

Monday, July 25, 2011

Hand Quilting for the First Time

Since I am making an effort to finish the quilt tops that I have done (I have 6 currently) the jelly roll race quilt was next on the list. Then I had this wonderful idea to hand quilt it. I thought it would be the perfect way to learn to hand quilt, after all how hard is it to sew a straight line by hand? Harder than I had expected it to be that's for sure.

I wanted to use several different colors so first I bought DMC floss. I though that would give me the best color selection. After doing a few rows I wasn't sure if the 2 strands I was using would stand up to washing. I asked several of my quilting tweeples and they recommended using pearl cotton instead for the look I wanted. So I learned that lesson the hard way and back to Joann's I went to get pearl cotton. Luckily I had a ton of coupons so every skein was discounted. I'm sure the people behind me were thrilled with me, but I every penny saved is more I can spend on fabric :)

I decided to just do a running stitch down the center of each row. The first few rows I did were pitiful and they got pulled out pretty quickly. Then a funny thing happened, I found my rhythm! I am using pretty big stitches so this is not traditional at all, but I like the way it's coming out. Is every stitch the same length, no. Are my lines totally straight, no. But no matter what it's mine and will be a nice cozy quilt for the guest room.


So next time you try something new don't be too hard on yourself. Be proud of what you have done!

Sha :)

Wednesday, July 20, 2011

1 Choice 4 Quilting

Shawna over at 1 Choice 4 Quilting has some great things going on!

She has a tutorial on how to square up HSTs.
And am awesome giveaway of some Amelia and Hometown fabric.
She also has the Online Quilting Book Club Quilt-along that's doing a cute quilt by Amy Ellis this month.

So check out her blogs and while your there check out her store. She has great prices, fast shipping and usually puts goodies in her packages, which makes getting a package from her even more fun.

Sha :)

Tuesday, July 19, 2011

United Forever Double Block of the Month

The first Saturday of each month is a fun day at The Berry Patch in Fort Worth. That's when the United Forever Double Block of the Month Club meets. We are doing blocks from the civil war era using 2 of Kaye England's books; United Forever and A Civil War Legacy.

Today I decided to work on the first block. It's the Harriet Beecher Stowe block. As you may know she wrote Uncle Tom's Cabin and guess what? There's a cabin in the center of the block! This was by and far the most intricate and hardest block I have made to date, it took over 3 hours but was well worth the effort.

I decided that I was going to do this BOTM in different fabric than civil war reproductions. Our directions were to pick 2.5 yards of a focus fabric and get FQs along the way. I choose a bright pink with white and black flowers as my focus fabric. The FQs I have are all black, white and gray. I want this to be kinda funky and fun and I think my fabric choices reflect that (so far).

Here's my finished block. It measures 12.5" square, which excites me more than anything :)


Have you tried any civil war era blocks yet? I still have to do the Ohio Cluster block, but that will have to wait till another day, I am worn out from this one block.

Sha :)

Monday, July 18, 2011

Central Park Quilt Top

Have you ever had a design for a quilt in mind and when you were done it didn't quite look like you thought it would? Well that happened to me this weekend and I am still not sure what I think of this quilt top.

Once I decided on the pattern for the blocks I layed them out and it seemed a bit too busy for me. Plus I wanted it to be longer than it was.


So I decided to add white strips between the rows, but my mistake wasn't laying it all out to see the new effect before I started sewing. I just put a sash of white between the top 2 rows, which looked OK to me. Once it was done this is what I got. I am a very symmetrical person and how "off" the diagonals are is bothering me. Since I do not want to rip it all out this quilt top will stay as is, but with 2 borders added. I am going to add a thin white border to frame it and them a larger border of some central park fabric.

Please tell me that I am not the only one who has had this predicament.

Sha :)

Saturday, July 16, 2011

Fire!

Fire! That's what happened to my iron during the week. This was not a fancy iron and I had it for a long time with no problems. It had an automatic shut off and worked great. I had been using it and was done so I unplugged it. Then I remembered I had 1 more seem to press so I plugged the iron back in and walked away to get a drink while it was warming up. I picked up the iron and pressed it to my nice newly made Farmers Wife QAL block. When I removed the iron from the fabric I saw black soot on the block (cry). That's when I realized that something was wrong. It was at that moment that black smoke started coming out thru the top of the iron. I immediately unplugged the iron and took the block to the sink to try to get the soot off. I don't know what I was more upset about the; iron breaking or the block being stained. Luckily the block was OK, but my iron and ironing board cover need to be replaced, which I will be doing later today. Here's the block, not pressed since it was wet, but it looks OK just the same. There is just a little soot on this pic, but I was able to get it out after I took the pic.
The moral of the story is to keep an eye on your iron, even those with automatic shut off, you never know when danger might strike.

Friday, July 15, 2011

There's a store I didn't know about in Fort Worth...huh?

This tweet just showed up on my feed:
New FabTalk: FabTalk Blog Network – Fort Worth Fabric Studio Blog: Fort Worth Fabric Studio is a shop in Fort Wo...
Here's the link for the shop They are having a great giveaway on their blog too.

Off to the movie! I'll post more later!

Sha :)

Wednesday, July 13, 2011

Farmers Wife Block 11 - Broken Dishes

Today I worked on block #11 Broken Dishes. Did I say that I hate using templates? Well I do and will do anything to figure out a better way to make these blocks. This is one that was pretty straight forward. I saw Amanda's blog post on this and put my own spin on it so now you have 2 different ways to make this block without templates.

This is a pretty straightforward block, 4 four patch blocks. The HSTs need to be 2" when trimmed. This time I used my handy dandy Accuquilt Go, but any way that you want to make these HSTs will work. Here's the other methods I use the pinwheel way and the HST ruler way. Note - If you are using the Pinwheel method cut the fabric squares 4.5" and if using the HST rule method you will make your strips 2.5".

  • To make this I cut 16 2.5" HSTs of each color with my Accuquilt Go. Hint - cut your fabric 3" x 3.5", this will fit the die and have very little waste.
  • Then make 16 HST squares, press towards the darker color and trim to 2".
  • I put this block together by making 4 four patches. Sew 2 HST blocks together making sure to press the seems toward the dark triangle. You will make 8 sets of these 2 patches.
  • I then sewed those 2 two patches into four patches. The seems should match in the center and the diagonals.
  • The trick to making these easy is in the pressing. If you follow these directions all the diagonals will meet up every time.
  • On 2 of the four patches press the seem towards the top and the other 2 towards the bottom.
  • Lay the blocks out with the 2 blocks that are pressed towards the bottom on the left side and the 2 towards the top on the right.
  • Sew the top 2 blocks together pressing the seem towards the right and the bottom 2 blocks with the seem towards the left.
  • Then simply sew the top row to the bottom row.
Here's a picture of the back of my block. And the finished block.

 I hope this helps make this block easier. If you have any questions please post them below and i will get back to you.

Sha :)

Tuesday, July 12, 2011

More Half Square Triangle Hints

Lately I feel like the Queen of HSTs. That's all I seem to be making lately. I have had quite a few questions about these so here's a few more tips to add to my tutorials on making HSTs. You can find the tutorials on how to make HSTs here: Using a HST ruler and Pinwheels made easy

Hint 1 - Figure out which was to press the HSTs before you trim, this will make putting them together easier. In examples 1, 2 and 3 all the seems should be pressed the same direction. In example 4 two of the HSTs are pressed in the opposite direction.

Example 1
Example 2


Example 3
Example 4


Hint 2 - It's very important to make sure that the diagonal seems interlock. This seems to be where mistakes begin, which throws off the rest of your block construction. The pic below shows exactly how they should meet. Then start sewing them together where the diagonal seems meet, that way you are assured that they will be perfect points.

Hint 3 - Once you have 2 HSTs sewn together finger press the seems open (no need to press unless you want to). If you pressed the seems in the right direction on you HSTs then this part will be easy. There's 3 places where the seems will meet. Both diagonals and the center. When I first started making these I did a test to make sure that the points in the center would all meet. I would just put a dot or small line in water soluble ink where the quarter inch seems allowance is. Then I put a pin thru the 2 dots to make sure they met. If one seem was slightly bigger than the other I could adjust accordingly. With practice you will find very quickly that you won't have a need for this step even, but its a good check when learning to piece these.

I hope these hints help you next time you are making HSTs. I'd love to hear your hints too.

Sha :)

Monday, July 11, 2011

Crockpot Chicken Burrito Filling

Here's the Crock pot Chicken Burrito recipe I posted on twitter a few minutes ago:

2 pounds boneless skinless chicken breast
1 jar of your favorite salsa
1 package dry taco seasoning mix

Place the chicken breast in the crock pot.
Mix the salsa and taco seasoning together and pour over the chicken.
Cook on low 6 - 8 hours.
Shred the chicken in the crock pot with tongs or 2 forks. If you want this to be creamy you can add a dollop of sour cream.
Serve on flour tortillas topped with cheese.

Enjoy!
Sha :)

Are you a Farmers Wife?

This Farmers Wife Quilt Quilt-a-long is very popular right now among quilters in twitterville and blogland. I decided to join the QAL over a month ago, then missed 4 weeks so I am playing catch up a bit. Here's the 6 blocks I have done so far:


I know I skipped Birds in the Air, yes I admit it, I am a big ole chicken afraid of some birds (and since chickens are bird then I am really afraid), but I promise I will persevere soon. Meanwhile if anyone has any hints for this block please tell me before the hair pulling begins :)

Project Linus update:
I have 4 volunteer Blanketeers so far. I just need 11 more so please give this great cause 1 hour of your time and a few scraps to help a child who needs some quilt love. All the info is here.

Happy Quilting today!
Sha :)

Sunday, July 10, 2011

Project Linus Quilt...Become a Blanketeer today

Did you see the block I made for Project Linus? This is a great organization, here's their mission:
Project Linus is comprised of hundreds of local chapters and thousands of volunteers across the United States. Each volunteer and local chapter all work together to help us achieve our mission which is to provide love, a sense of security, warmth and comfort to children who are seriously ill, traumatized, or otherwise in need through the gifts of new, handmade blankets and afghans, lovingly created by volunteer "blanketeers."

Jan of Daisy Janie asked for volunteers to make a block for the Project Linus quilt she was making with 2 charm packs of her geo grand line and now I am steeling her idea and doing something similar :). Here's how it would work...

1. Each volunteer Blanketeer would make 2 'L' blocks from the tutorial I posted under Project Linus. They can be any color combination, all I ask is that the 'L' have white on the sides like mine did, this will make the 'L' really pop.
2. Mail the 2 blocks to me and I will put them together, quilt it and then send it off to Project Linus. The due date for the blocks will be August 15th. That gives us all a month to get these blocks done.
This is a great project that will help a child in need. If you are interested in joining post below and I will send more info your way.

Sha :)

Friday, July 8, 2011

100 Followers! Time for a giveaway!

Yay reached 100 followers...time to giveaway some goodies! These cute charm packs are perfect to make a Christmas table runner and placemats! Thanks to Shawna from 1 Choice 4 Quilting for sponsoring this giveaway!

Here's the 3 winners of charm packs!

Jacqueline said...
I'd be all over a Christmas something or another! Im so indecisive I just dont know what! =)
Enter a lower limit:
Enter an upper limit:

Random Number:

Catskill Quilter said...

My favortie fabric line is Little Apples -- just love those tiny drawings!
Enter a lower limit:
Enter an upper limit:

Random Number:

Sara said...
My favorite for NOW IS (drumroll please,jk!) Ruby!!
Enter a lower limit:
Enter an upper limit:

Random Number:

Congrats to all the winners!!! Please email me your mailing address so I can send your prizes out to you!

What to do with leftovers from a quilt...recycle them

This idea has been brewing in my brain for a while and I am finally ready to reveal it. I don't know about you, but I always have some left over fabric after I make a quilt. Especially if I used fabric I purchased a while ago, before I had a quilt in mind for it. While I love scraps, I find that there comes a point when I have too many scraps from a certain line of fabric, too much but not enough to make another quilt. So I was thinking, why not send the scraps to a friend who is making a quilt with that fabric line? That's where my inspiration for this kind of swap/group came into play.  

Basically group members would post a pic or description of fabric they have left over from a past project and maybe even post of pic of what they made with the fabric. For instance I have leftover Frolic and Spirit fabric that I will not be using anymore. I would be happy to send them to someone that would use it in a project. You could choose to just send the fabric along with best wishes or trade it for something else, it is totally up to the traders. I traded some Sunkissed with QuiltDad a few months ago for some FQs that he was looking for, anything that the traders come up with is good. Then when you make something with the fabric you could post what you made for all of us to ooh and ahhhh over. What do you think? If 4 or 5 of my followers joined we could have a nice group going.

Let me know if you would be interested in this and I will get the ball rolling. Also if there's any questions just post here.

And remember just 3 more followers (I know there are more RRS followers, but I need to see 100 followers on the follow me list) and I will giveaway the cute charm packs!

Sha :)

Thursday, July 7, 2011

July Goals

Since returning home, I have been having trouble finding my quilting mojo and want it back! With the craizeeness of who I am, to do lists have always been helpful. So here's my to do list for July:

1. Every weekday make 8 pieces for the central park quilt I am making. Here's a sample of what they look like: (When I say 8 pieces, I mean enough to make 2 of these blocks)


2. Catch up on the Farmers Wife Sampler QAL (I need 7 more to catch up) and then make 2 blocks per week.
3. Make 2 civil war blocks this month. This is from a Double Block of the month club at The Berry Patch. While the blocks are traditional, I am using modern fabric in black, white, gray and pink.
4. Make 25 trees for the Misfit Quilters Swap. This is a great group of quilters who found each other on twitter and are swapping with each other. Last month we swapped doll quilts (pictured below) and this month we are swapping trees  to make our own forest of Christmas trees.


4. On Sunday do the Christmas QAL with Charlie from Qubee Quilts. I am using How the Grinch Stole Christmas fabric for this QAL, it is my Hubby's favorite Christmas show from when he was growing up. My July goal is to totally finish the quilt not just the top. 
5. Make the 3rd quilt of the Online Quilting Book Club. We are still using the Modern Basics book by Amy Ellis. It's a wonderful book with easy to follow patterns that make these quilts fun to make. I just joined the Designer Select FQ Club at the Fat Quarter Shop and have the two sets I missed being shipped to me. I think I will use Tula Pinks Prince Charming for this quilt, what do you think?
6. Make 5 yoyo's every weekday for a table topper in my dining room. The one I have now has a stain on it that magically appeared while I was in NY, hmmm its very mysterious :)

Well That's my July goal list. What's on yours? We can help keep each other accountable.


Sha :)

Wednesday, July 6, 2011

Project Linus

Jan Dicinto of Daisy Janie sent me and nine others 8 charm squares from her Geo line. My challenge was to make a block using only those 8 charms. Then she will put together all the blocks and make a cute quilt for Project Linus. I was inspired by the L in Linus  so here's what I came up with.

Then I started thinking how making a Project Linus quilt of 'L's would be really nice. Since I didn't take pics for a tutorial when I was making the block with Daisy Janie material and don't have any left I made 1 with scraps of Sunkissed that I had.

Here's what you will need:
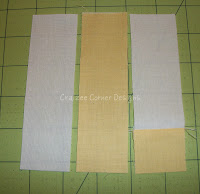
Yellow solid - 1½” x 5” and 1¾ x 1½”
White solid - 1¾” x 4” and two 1½” x 5”
Gray print - two 1½” x 5” and two 1½” x 6¾”
Yellow print - two 1½” x 6¾” and two 1½” x 8¾”
1. Sew the White 1¾” x 4” to the yellow 1¾ x 1½” and then sew that piece to the right side of the yellow 1½” x 5”  
2. Sew a white 1½” x 5” to the right and left side of the L piece.

3. Sew a gray 1½” x 5” to the right and left side then sew a 1½” x 6¾” to the top and bottom.
4. Sew a yellow 1½” x 6¾” to the right and left side then sew a 1½” x 8¾” to the top and bottom.


There you go! What a perfect way to honor Project Linus with an L shaped block.
I hope you like this tutorial, if you do leave me a comment (I love comments).

Sha :)

Tuesday, July 5, 2011

Quilt Borders

Last month, while at Sit and Sew at The Berry Patch in Fort Worth, I was lucky enough to get a new book called Nickel Quilts and Borders by Pat Speth. It's devoted entirely to 5" squares that make different borders (260 different ones to be exact). There are also 7 quilt patterns in this book, but the main event is the borders. If you have ever wanted a special border and didn't know what to make this is the book for you. I even plan on making a quilt with some of the border strips, kinda like a border sampler quilt. This book is a wonderful addition to any quilters library. Keep an eye on my blog for a possible Quilt-a-long using this book. If you would be interested in that leave me a comment, I love comments!

Also dont forget to follow me and enter the 100 follower giveaway, I want to give these charm packs away this week.
Sha :)


Monday, July 4, 2011

Happy 4th and a giveaway!

Happy 4th of July y'all!

Tonight we will be back home and after 3 weeks away I can't wait to sleep in my own bed and to spend some quality time with my sewing machine tomorrow. I feel like there's so much I have to catch up on, I have the Misfit Quilters Swap, the FWSQ QAL, the Civil War double block of the month club at the Berry Patch in Fort Worth and others. I know I have a few packages waiting for me at home which I can't wait to open. Plus I want to get back to blogging, there's so many things I want to share with you and some goodies to pass on that I got in NY.

Speaking of blogging, please enter the 100 follower giveaway and spread the word about it. The past months events in my life prohibited me from blogging, but now I am ready to pick up where I left off. See this post 100 follower giveaway for info on how to enter. I would love to give these charm packs away this week. They would be perfect to use for the Christmas Quilt-a-long by Qubee Quilts.

Till later!
Sha :)